How to Do Outline
How to do outline. Learn how to do an outline with a repeatable process, real templates, and practical examples for essays, blog posts, presentations
Written by
 Mathias Michel
You've opened a document, typed the title, and now the cursor is blinking with unreasonable confidence. You have notes, browser tabs, and a rough idea of what you want to say, but every possible first sentence seems either too broad or too early. So you start drafting, collect more research, move paragraphs around, and eventually discover that the middle of the piece is answering a different question from the introduction.
That's usually not a sentence problem. It's a structure problem. Learning how to do outline means learning how to make the important decisions before you spend energy polishing prose. An outline is a thinking tool that helps you decide what the piece means, what evidence belongs in it, and what the reader should understand next.
Why Outlining Is a Thinking Tool, Not Just a Plan
A weak outline resembles a filing system. It lists headings such as “Introduction,” “Benefits,” and “Conclusion,” yet gives the writer no clear job for each part. A useful outline works more like a rough argument: it identifies the central claim, divides that claim into supporting branches, places evidence beneath each branch, and sets an order that leads the reader from one idea to the next.
Academic writing guidance treats outlining as a hierarchy, not a decorative format. Purdue OWL's outline guide recommends brainstorming, organizing, ordering, and labeling ideas, moving from general points toward specific evidence. That sequence matters. It makes you decide which ideas belong together before you spend time making their wording elegant.
Outlining forces decisions early
Suppose you are writing about better team meetings. Without an outline, you might open with a broad observation about workplace communication, add a paragraph about agendas, wander into meeting software, and end by recommending shorter calls. Each paragraph may be sensible, but the piece makes no single promise.
An outline requires a choice. Is the article about reducing meeting time, improving decisions, or helping remote teams participate? These subjects overlap, but they are not the same subject. Once you select one, material that does not serve it becomes easier to remove.
Practical rule: If you can't state what the draft will prove in one sentence, you aren't ready to organize its supporting sections.
The outline also reveals missing evidence. “Why feedback matters” names a topic. “Regular feedback helps writers identify structural problems before sentence-level editing” makes a claim. The second version tells you what examples, explanations, or sources the draft must provide.
It gives revision a compass
Writers who draft first often discover the structure only after producing a large amount of prose. That method can work, but restructuring a finished draft creates attachment and demands repeated rereading. An outline moves those decisions to an earlier, less expensive stage, when a section can be renamed, merged, or deleted without sacrificing a polished paragraph.
A writing guide from the University of Texas at Arlington describes analytical writing through a “Rule of Three,” in which a thesis is supported by at least three key points or pieces of evidence. The principle applies beyond history essays. If your central claim has only one vague supporting branch, the outline is showing that the argument may need more development.
A good outline does not imprison the draft. It gives the draft direction while leaving room for discovery. Use the outline as a test of the thinking: can each section support the claim, does the sequence make sense, and can a reader tell why one point follows another? The final version should remain easy to change while preventing you from writing into a corner.
A Repeatable Five-Step Outlining Process
You don't need a special app or a complicated numbering system to learn how to do outline work. Start with a blank page, a timer, and a willingness to keep early ideas ugly. The process below works for essays, articles, presentations, reports, and internal documents.
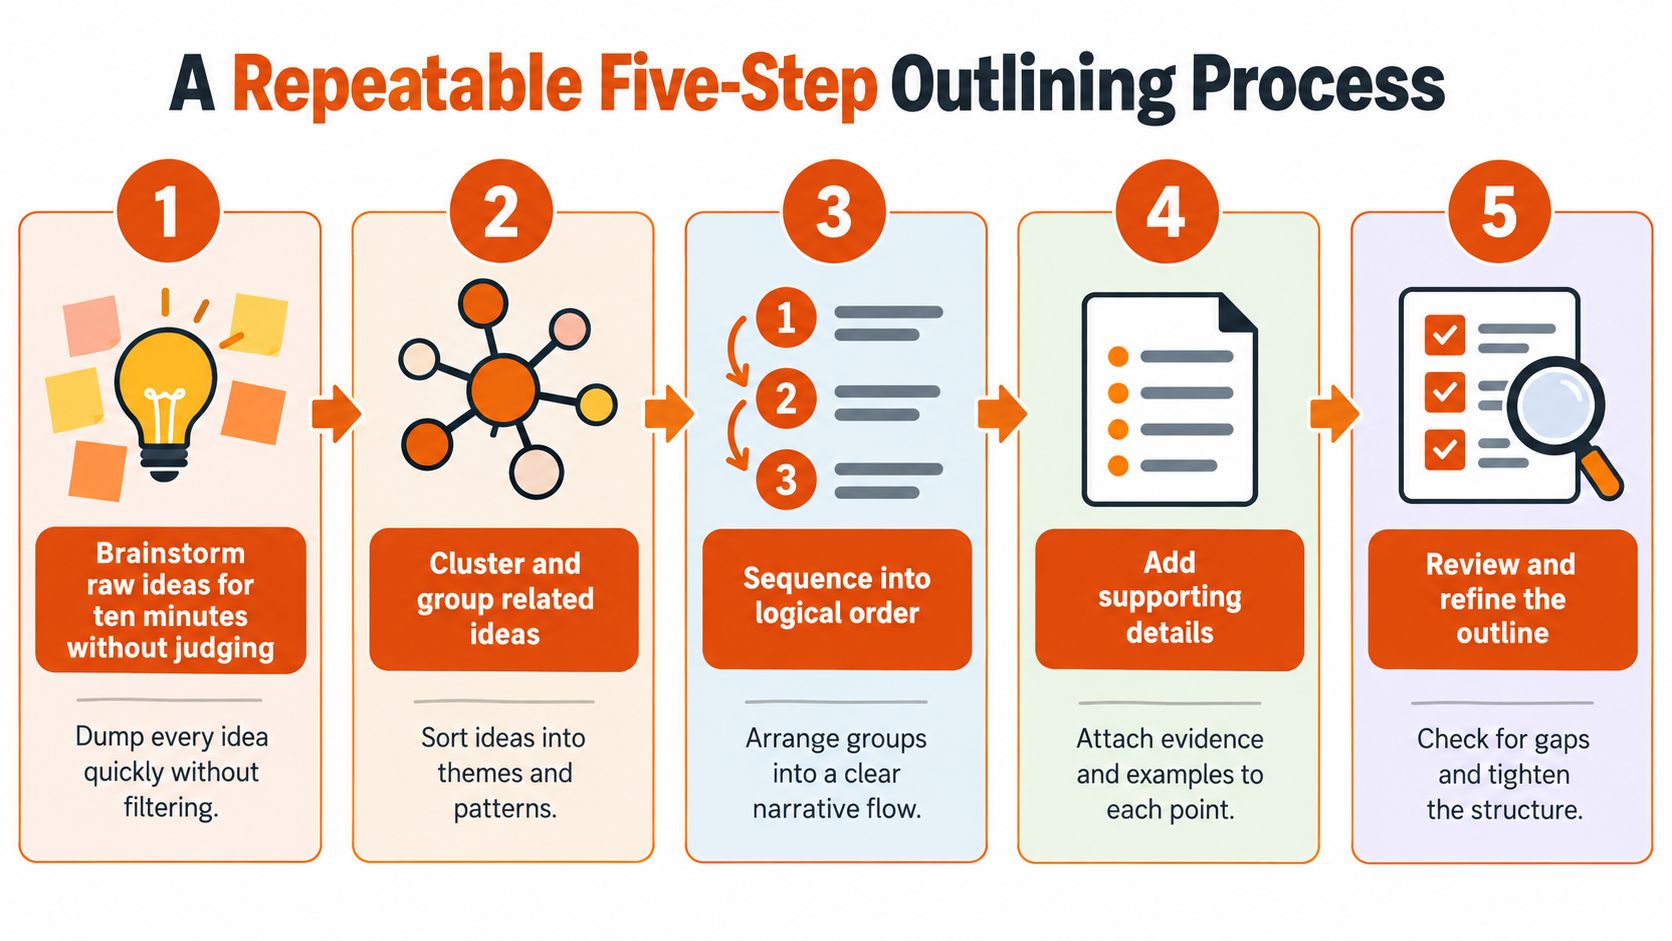
1. Brainstorm before you judge
Spend a short, focused period dumping ideas. Write questions, examples, objections, experiences, source notes, and possible conclusions. Don't sort them while they arrive. Sorting too soon makes writers protect the first idea they had, even when a later idea is stronger.
If your topic is “how students can revise essays,” raw notes might include thesis clarity, reverse outlines, peer feedback, cutting repetition, paragraph order, grammar checks, and the difference between editing and revising. At this stage, all of those notes can coexist.
2. Cluster related ideas
Look across the page and group notes that answer the same question. You might create groups called “finding the main claim,” “checking paragraph function,” “testing evidence,” and “polishing sentences.” Keep the groups broad enough to hold several notes, but not so broad that every idea fits everywhere.
The Harvard-style workflow summarized in an academic outlining study follows a similar movement from collecting and arranging material toward generalizing, ordering, and combining ideas. The point isn't to make notes look tidy. It's to discover the categories your thinking already contains.
3. Order the clusters
Now choose the relationship between groups. A tutorial usually needs sequence. An opinion essay may work as claim, evidence, counterargument, and response. A report may move from context to findings to recommendations. Don't force every topic into the same introduction, three points, conclusion pattern.
Ask one practical question: What does the reader need to understand before this section makes sense? Put that earlier. If a later section depends on a definition, example, or problem, the dependency determines the order.
4. Label each group with a job
Replace vague headings with working claims. “Research” becomes “Separate evidence about causes from evidence about effects.” “Tips” becomes “Use paragraph-level questions to test whether each section earns its place.”
Under every heading, write one sentence beginning with “This section must show that...” If you can't finish that sentence, the branch is probably still a topic rather than an argument.
5. Test the skeleton aloud
Read only the headings and the one-sentence section jobs. Your ear will catch repetition, abrupt jumps, and missing steps faster than silent reading often does. If the outline sounds like a list of unrelated topics, change the order or add a transition before drafting.
For a reusable workflow, save this checklist:
- Brainstorm: Dump raw ideas without filtering.
- Cluster: Group related notes and name the emerging themes.
- Order: Choose a structure that matches the reader's task.
- Label: Give every branch a clear job and supporting claim.
- Test: Read the skeleton aloud and repair gaps.
You can also adapt the process to a broader content creation workflow, especially when several people will research, draft, edit, and publish the same piece.
A short video can reinforce the sequence visually:
<iframe width="100%" style="aspect-ratio: 16 / 9;" src="https://www.youtube.com/embed/xM7sAD_oEDk" frameborder="0" allow="autoplay; encrypted-media" allowfullscreen></iframe>Templates for Essays, Blog Posts, Presentations, and Papers
There isn't one perfect outline shape. The right template depends on what the reader must do with the information. An essay needs an argument, a blog post needs a useful path through a question, a presentation needs spoken pacing, and a technical specification needs decisions that others can implement.
Five useful skeletons
Classic five-paragraph essay
- Introduction: Establish the topic and state the thesis.
- Supporting point one: Develop the first reason or piece of evidence.
- Supporting point two: Develop the second reason or piece of evidence.
- Supporting point three: Develop the third reason or piece of evidence.
- Conclusion: Synthesize the argument and explain its significance.
Use this when a short assignment requires a clear central claim and a limited set of supporting points. It's the wrong choice for a complex research project, a nuanced literature review, or any topic that needs more than parallel reasons. For a more detailed version, see this argumentative essay outline template.
Blog post
- Hook: Name the reader's problem or create a specific tension.
- Problem: Explain what makes the problem difficult.
- Promise: State what the reader will learn or be able to do.
- Main lesson: Deliver the method, argument, or explanation.
- Takeaway: Condense the practical conclusion.
- Call to action: Give the reader a relevant next step.
This format suits instructional and informational posts. Skip it when the piece is a formal report, a personal narrative with no instructional promise, or a source-driven academic article.
Presentation
- Opening hook: Give the audience a reason to pay attention.
- Core slide one: Present the first idea, with one main point.
- Core slide two: Build the next idea or show the evidence.
- Core slide three: Address an objection, implication, or example.
- Additional core slides: Add only ideas that earn their speaking time.
- Closing call to action: State what the audience should remember or do.
A presentation outline must account for listening. Dense subpoints that work on paper may fail when spoken aloud. Use this structure for talks and workshops, not for a detailed written argument.
Research paper
- Abstract: Summarize the question, method, findings, and conclusion.
- Introduction: Establish the problem, purpose, and thesis or research question.
- Literature review: Group previous scholarship by theme, debate, or method.
- Methodology: Explain how the investigation was conducted.
- Results: Present the findings without stretching them into conclusions.
- Discussion: Interpret the results and relate them to the research question.
- Conclusion: State what the work contributes and what remains unresolved.
- References: List the sources used.
Choose this for empirical or source-intensive academic work. Don't use it for a short reflection, a basic classroom essay, or a blog post that doesn't have methods and results.
Developer or specification document
- Context: Explain the problem, users, and current situation.
- Goals: Define what the work should achieve.
- Non-goals: State what the project won't attempt.
- Proposed approach: Describe the recommended solution.
- Alternatives: Record options considered and why they were rejected.
- Open questions: Identify decisions that still need answers.
- Milestones: Divide implementation into meaningful stages.
This template fits engineering proposals, product decisions, and internal technical documents. It's a poor fit for persuasive essays or reader-focused tutorials where the audience needs a narrative rather than a decision record.
Outline templates at a glance
| Template | Core Sections | Best For | Skip If |
|---|---|---|---|
| Essay | Introduction, three supporting points, conclusion | Short thesis-driven assignments | The argument needs several methods or debates |
| Blog post | Hook, problem, promise, lesson, takeaway, CTA | Practical reader guidance | The document requires formal research sections |
| Presentation | Hook, core ideas, closing action | Talks, workshops, briefings | Readers need detailed written evidence |
| Research paper | Abstract, introduction, literature review, method, results, discussion, conclusion | Academic investigation | The piece has no research method or findings |
| Developer or spec document | Context, goals, non-goals, approach, alternatives, questions, milestones | Technical decisions and implementation | The audience needs a conversational explanation |
Choose by purpose, not habit. If you're teaching a process, use sequence. If you're defending a position, use claim and evidence. If you're recording a product decision, use context, constraints, alternatives, and unresolved questions.
Two Worked Examples You Can Model
Finished outlines can look deceptively clean. The useful part is seeing the decisions that remove clutter. These examples show how a writer moves from a pile of plausible notes to a structure with a single promise.
Example one, a focused blog post
Working title: How Small Teams Run Better Retrospectives. The first version is too broad. Scratch notes include meeting length, psychological safety, action items, anonymous feedback, rotating facilitators, project metrics, remote tools, team conflict, sprint reviews, and icebreakers.
The writer narrows the promise to this: Help a small team leave a retrospective with one honest insight and a specific action to test. That promise immediately makes some notes secondary. Icebreakers and general meeting software don't earn central sections unless they support honesty or action.
The messy version might read:
- Retrospectives
- Why meetings fail
- Tools
- Feedback
- Trust
- What went well
- What went badly
- Action items
- Follow-up
- Remote teams
- Facilitation
- Metrics
The tightened outline becomes:
- Opening: A retrospective fails when the team records observations but makes no decision.
- Why small teams need a narrow question: Limited time and overlapping roles make broad discussions drift.
- Use a prompt that produces evidence: Ask for a specific event, not a general mood.
- Turn one observation into one experiment: Define the change, owner, and review point.
- Protect candor without creating theatre: Let the facilitator separate blame from process problems.
- Close: Review the experiment at the next team checkpoint.
The writer merges “what went well,” “what went badly,” and “feedback” into the prompt section because they're types of observations, not separate lessons. “Tools” becomes a minor note under facilitation rather than a full branch. The order follows the reader's real task, identify the problem, gather useful information, choose an action, and protect the conversation.
Example two, a literature review
The topic is remote-work productivity. The writer has ten sources, but source order would create a dull catalogue. Instead, the notes cluster into three themes:
- How productivity is defined: output, concentration, collaboration, and self-reported experience.
- What conditions shape results: autonomy, interruptions, communication practices, and role differences.
- Why findings disagree: measurement choices, job type, management practices, and differences between individual and team outcomes.
The writer chooses a funnel structure, moving from the broad definition problem toward the specific gap the review will address. The scratch version says:
- Source A
- Source B
- Source C
- Home offices
- Communication
- Productivity tools
- Hybrid work
- Employee satisfaction
- Management
- Measurement
That version organizes sources, not knowledge. The revised outline uses claims:
- Productivity is not one outcome: Research measures different forms of work, so findings can't be compared without examining definitions.
- Remote conditions affect different tasks differently: Autonomy may support focused work, while coordination-heavy work depends on communication design.
- Management practices shape the environment: Expectations, feedback, and availability norms can influence whether flexibility becomes useful or disruptive.
- The unresolved issue is comparison: Existing work needs a clearer separation between individual output, team coordination, and employee experience.
Each heading receives a transition sentence that can become the opening of the section. For example: “Before comparing remote and office work, the review must clarify what researchers mean by productivity.” That sentence does more than connect paragraphs. It tells the reader why the next branch exists.
Common Mistakes and How to Fix Them
Outlining usually fails because the writer chooses the wrong level of detail. A polished hierarchy built before the argument is clear becomes a set of boxes to fill, not a tool for thinking. Test the order and purpose of ideas first. Refine wording later.
Academic guidance identifies recurring problems such as unclear topic sentences, weak categories, poorly defined levels, and insufficient supporting detail. The writing-center outline handout from Austin Peay State University also stresses that every paragraph should support the central claim and that transitions should connect sections logically.
| Common Mistake | Why It Blocks You | The Fix |
|---|---|---|
| Writing polished paragraphs in the outline | You become attached to wording before the structure works | Start with branch labels, then expand only sections that survive reordering |
| Collecting research without a claim | Notes accumulate, but no evidence has a clear job | Ask, “What claim does this support?” before assigning a source |
| Using headings that name topics | “Background” and “Discussion” do not say what the section must prove | Turn each heading into a claim, question, or reader task |
| Ignoring transitions | The draft jumps between branches even when each branch seems reasonable | Write the bridge sentence before drafting the section it introduces |
| Locking the outline too early | New evidence or a clearer angle cannot improve the draft | Reserve one restructuring pass after the rough draft reveals its shape |
Detail can become avoidance
A ten-page paper does not need a miniature final paper before drafting. Le Moyne College's history-writing guidance gives a concrete benchmark of a one-to-two-page outline for a ten-page paper in double-spaced, 12-point formatting, as described in the outlining guidance. The exact length is not a universal law. The useful principle is that an outline should show scope and depth without replacing the draft.
Use detail to answer structural questions, not to postpone them. The academic discussion of iterative outlining supports a lighter structure that can grow after flow and organization have been checked. If every heading already contains full transitions, research summaries, and polished examples, the outline may be hiding an unresolved decision: whether that section belongs at all.
A practical test is simple. Remove one branch and read the remaining sequence. If the argument becomes clearer, the branch was probably carrying detail rather than reasoning. If the sequence breaks, state the missing claim in the outline before writing another paragraph.
Quick Tips for Non-Native Speakers, Developers, and Students
Generic outlining advice often assumes that every writer thinks, researches, and drafts in the same way. They don't. The structure should reduce cognitive load, not add another performance requirement.
For non-native English speakers
Begin in the language that lets you think fastest. You can write rough branch labels in that language, arrange the argument, and translate the labels once the logic holds. This separates structural thinking from language correction, which are different tasks.
When you convert the outline into English, label each section by function rather than topic. “Evidence,” “counterargument,” “example,” and “conclusion” tell you what the section must do. “Technology,” “education,” and “society” only tell you what it might mention.
Keep transition sentences simple. A clear sentence such as “This evidence shows why the first solution is incomplete” is more useful than a connector you aren't sure how to control.
For software developers
Treat the outline like a lightweight specification. Start with context, requirements, decisions, and open questions. For a technical blog post, each branch should be small enough to resemble a useful commit message: “Explain why retries create duplicate jobs” is more actionable than “Retries.”
A non-goals section is especially valuable. It stops a document about database indexing from drifting into a complete redesign of the data layer. If a new idea doesn't support the stated goal, move it to open questions or a later document.
For students
Under exam conditions, combine brainstorming and ordering into a fast pass. Write the thesis, list the strongest supporting points, and put them in the order that makes the argument easiest to follow. Use transitions as signposts so the marker can see when you're adding evidence, addressing an objection, or drawing an implication.
For more student-focused guidance, consult these practical writing tips for students. The same discipline applies to essays and presentations: a paragraph should earn its place by advancing the central answer.
An AI writing assistant can help turn messy notes into a labeled outline, especially when you already have the ideas but not the hierarchy. Give it your topic, audience, purpose, rough notes, and exclusions, then check every proposed branch yourself. AI can sort and rephrase material quickly, but it shouldn't decide what you believe or invent evidence to fill a gap.
Your Pre-Draft Outlining Ritual
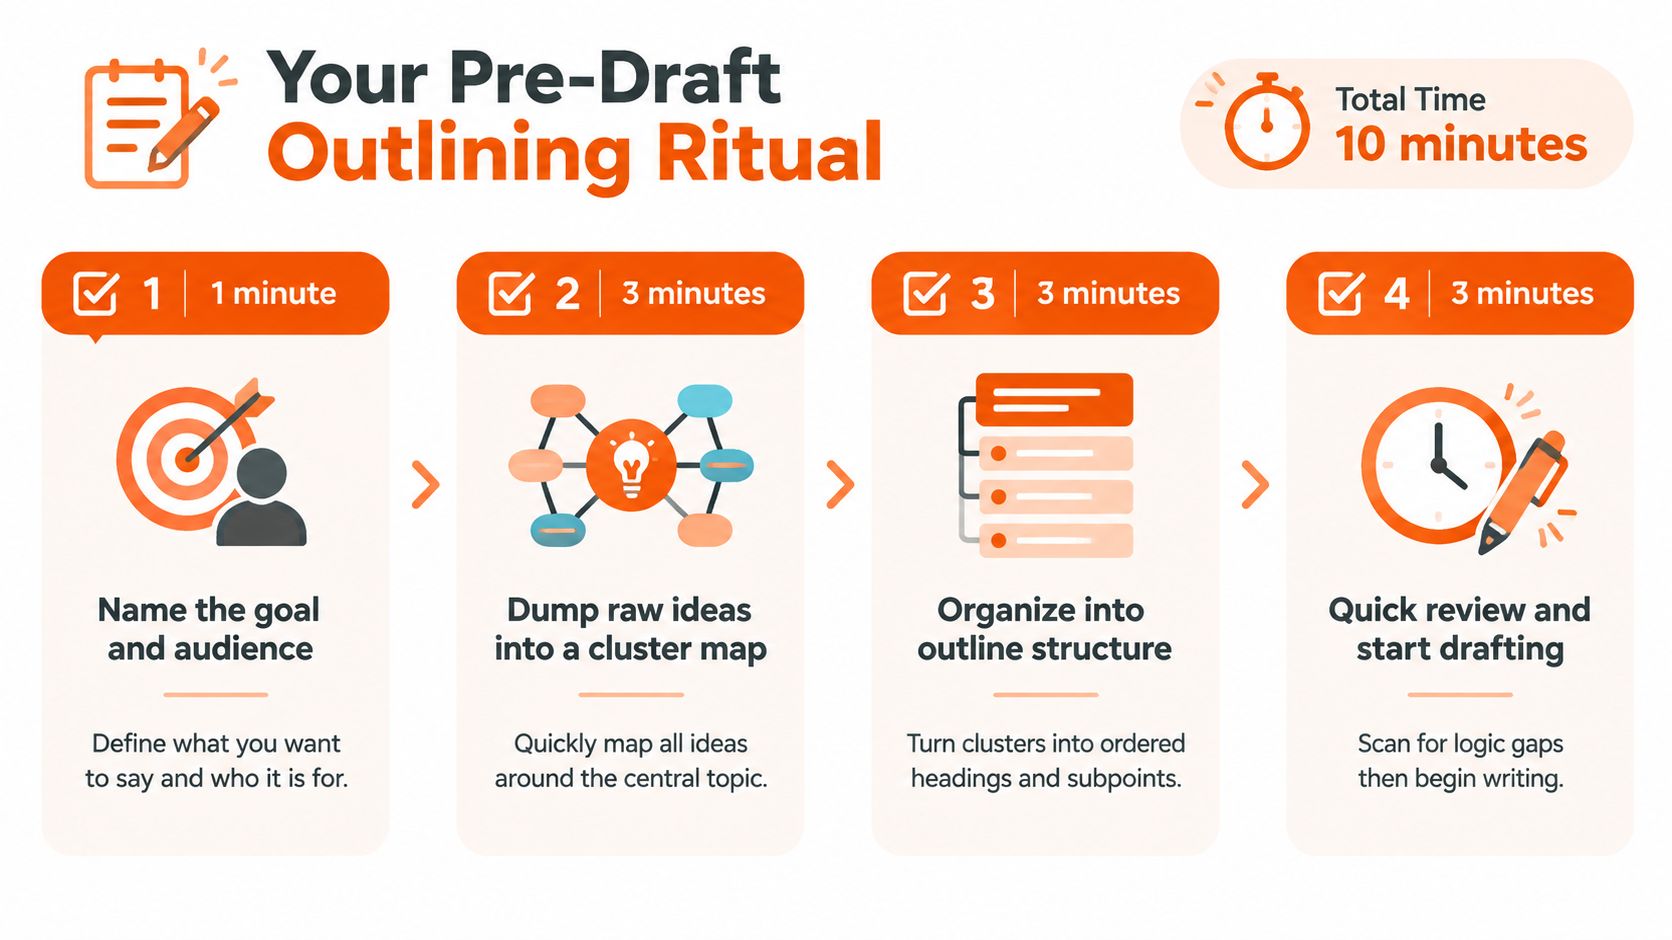
Use a short ritual before any substantial draft. It shouldn't feel like homework. Its job is to catch confusion while changing the structure is still easy.
Start with one minute to name the goal and audience. Write, “After reading this, [audience] should be able to understand or do [result].” Then spend three minutes dumping raw ideas into a cluster map. Circle related notes, but don't polish them.
Use the next three minutes to order the clusters into a working skeleton. Choose the relationship that fits the task, such as sequence, problem and solution, comparison, or claim and evidence. Spend two minutes labeling each section with its job, such as hook, context, evidence, turn, or payoff.
Finish with one minute of aloud testing. Read the headings and section jobs, listen for missing logic, and begin drafting from the first branch that has a clear purpose.
The outline serves you, not the other way around. Delete a section when the draft proves it isn't useful. Move a branch when a better order appears. A successful outline isn't a perfect document. It's a clear enough map to help you make the next intelligent writing decision.
RewriteBar helps you turn rough notes into a clean, labeled outline, then refine grammar, tone, clarity, and transitions in the app where you're already writing. Visit RewriteBar to build a faster outlining habit without losing your own voice.

More to read
750 Word Essay That Scores Well
Learn how to plan, draft, and edit a 750 word essay with the right paragraph split, timing, and word-economy tips. Includes a sample essay and revision
How to Write Papers on a Mac: A Complete Workflow
Learn how to write papers on a Mac with this practical workflow covering apps, citations, templates, Mac productivity features, and final export for submission.
Research Paper Writing: A Practical Workflow for Better
Master research paper writing with a clear workflow covering topic selection, structure, citations, and editing. Includes tips for non-native speakers and AI
Tags
Written by
Mathias MichelPublished
September 13, 2026