macOS Menu Bar: Customize, Master, and Use It Smarter
Learn how to customize icons, hide clutter, and speed up your workflow with the macOS menu bar. Practical tips, shortcuts, and settings for a cleaner desktop.
Written by
 Mathias Michel
You're halfway through an email when you notice the problem. The top of your Mac is crowded with tiny symbols, you can't remember which one controls sound, and a utility you installed to organize the icons has stopped behaving after an update. The menu bar looks simple, but it connects app commands, system status, notifications, shortcuts, and background tools.
Once you understand what each area does, the macOS menu bar becomes easier to control. You'll know what to keep visible, what to hide, which utilities deserve a permanent place, and how to reduce the risk of losing your workflow when macOS changes the interface.
Anatomy of the macOS Menu Bar
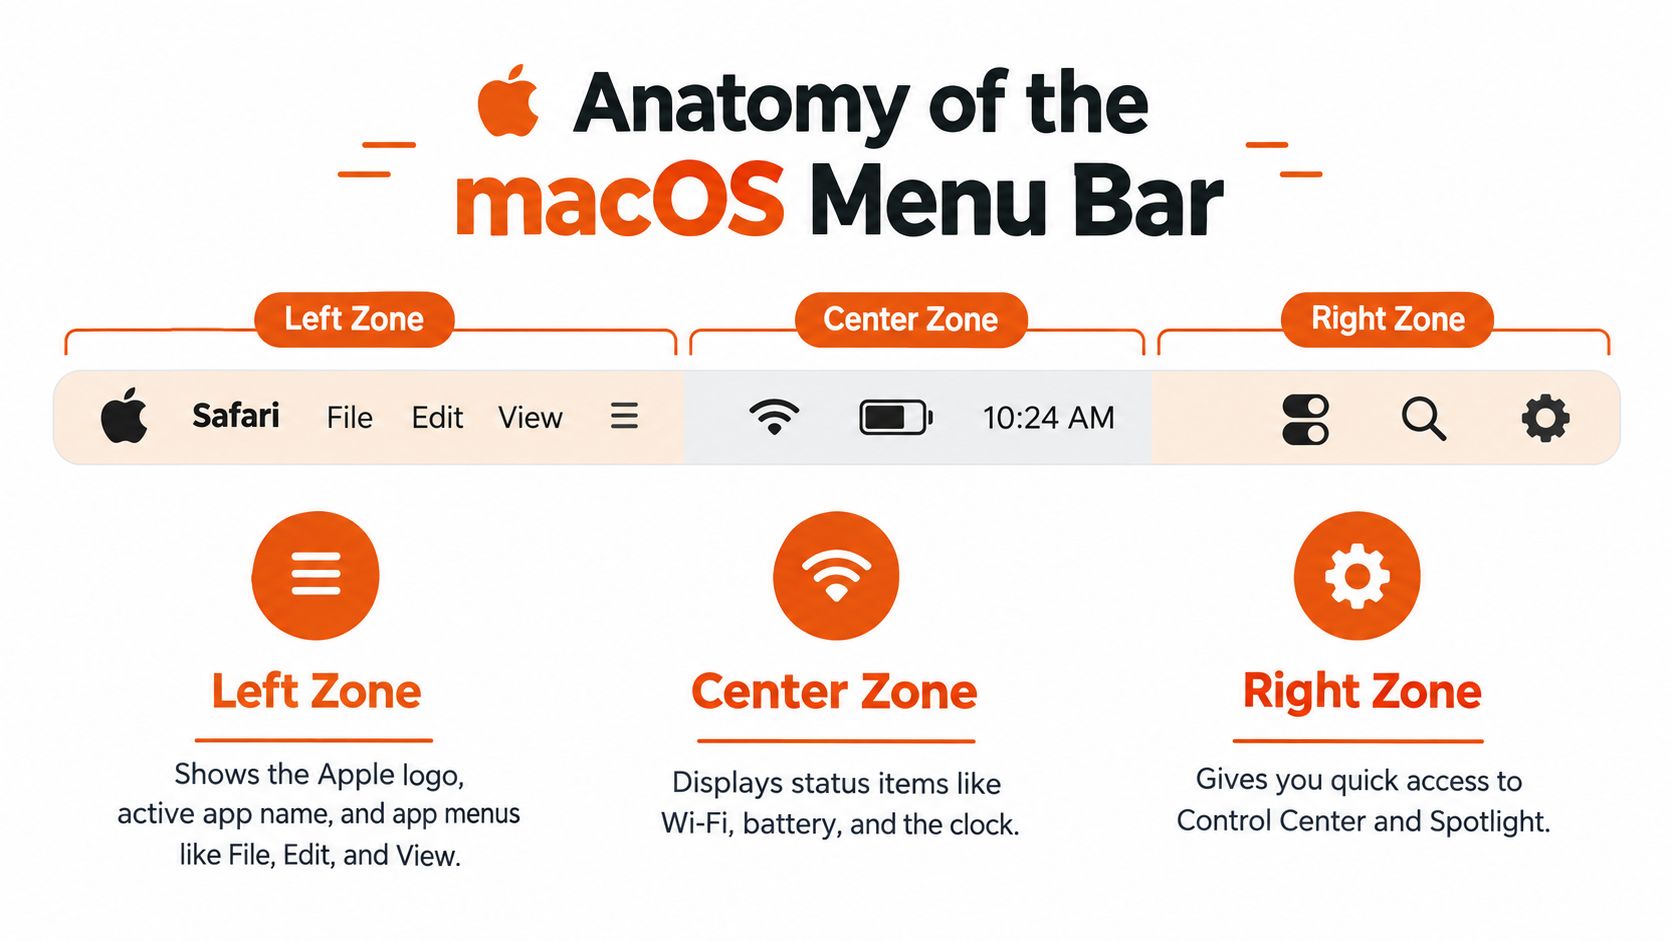
The menu bar is a single, screen-wide control surface, not just a decorative row of icons. Apple describes it as running across the top of the display, with the Apple menu fixed at the upper-left and the rest of the app menus changing according to the application currently in focus. (Apple's guide to the macOS menu bar explains this basic layout.)
Start by reading it from left to right.
The left zone belongs to the active app
At the far left, you'll find the Apple logo, the name of the active application, and menus such as File, Edit, View, Window, and Help. Open Safari, and those menus describe Safari. Switch to Pages, and the same region changes to show Pages commands.
That context sensitivity is why the left side can't behave like a fixed dashboard. The commands available there depend on the window you're using, so the active app determines what you can do without opening a separate settings panel.
The center is mostly a layout problem
The space between the application menus and the status icons may look empty, but it can become important when the right side gets crowded. On some Macs, items near the middle or the camera notch can be difficult to see, and newer macOS releases may group or reveal items through overflow behavior.
Treat this area as flexible rather than as a place to fill. A menu bar tool that needs constant attention may create more friction than it removes, especially if it pushes essential system controls out of sight.
The right zone reports system status
The right side contains system-wide information and controls. Depending on your Mac and settings, you may see Wi-Fi, battery status, sound, the clock, Spotlight, Notification Center, and Control Center. Apple introduced Control Center in macOS Big Sur, version 11, in 2020, bringing several quick system controls into a dedicated menu bar surface. (Apple's menu bar support documentation describes the distinction between changing app menus and system status menus.)
Practical rule: Keep commands you use inside the active app on the left, and keep system state and quick controls on the right.
Apple has kept the menu bar recognizable across the Mac's history while continuing to add status icons and control surfaces. You can also configure it to hide until the pointer reaches the top edge of the screen. Knowing what lives in each zone is the first step before you rearrange, remove, or add anything.
Built-In Customization in System Settings
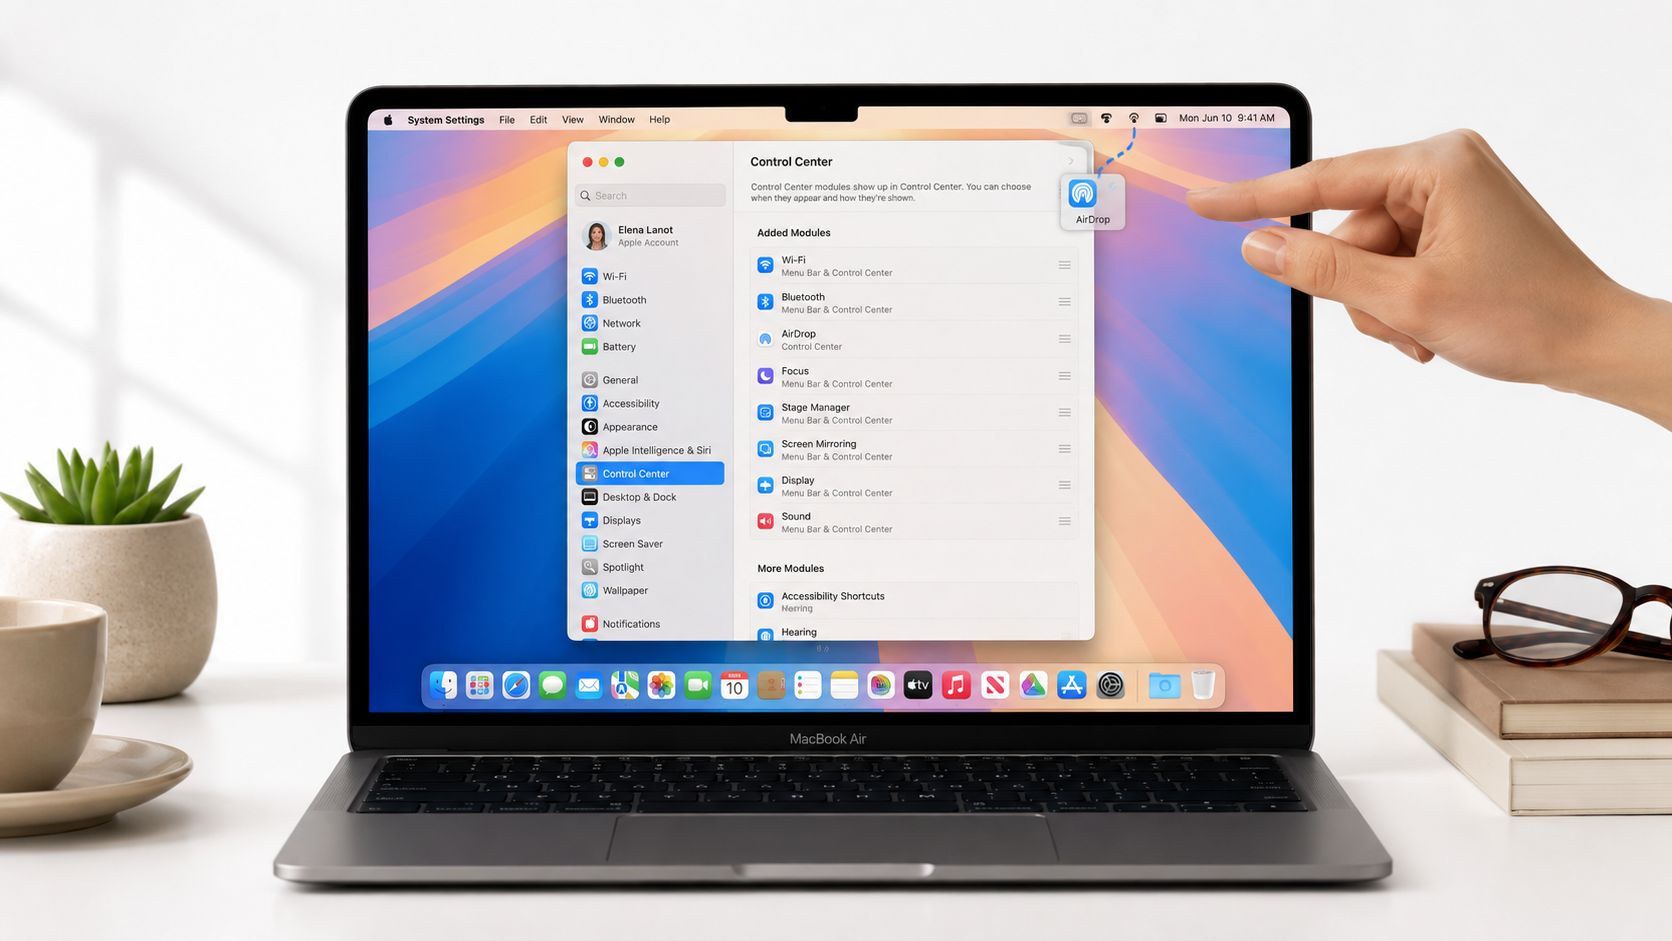
Before installing a menu bar manager, use the controls Apple already provides. Open System Settings, select Control Center, and inspect the sections for menu bar modules and system controls. The exact labels can vary by macOS release, but the basic decision is consistent: should an item appear in the menu bar, inside Control Center, or in both places?
Apple's settings let you move supported controls between the visible menu bar and a Menu Bar Only area. For items such as Bluetooth, Sound, Battery, and Wi-Fi, look for options that keep them visible when you need immediate access. Battery settings can also include a percentage display, which is useful if an icon alone doesn't give you enough information.
Hide what you check rarely
The best candidate for removal isn't necessarily the largest icon. It's the item you almost never open. If you rarely change sound output, for example, you can place Sound in Control Center rather than keeping it permanently visible. If you check battery status often while working away from a charger, leave it exposed.
Notification Center and the clock have their own behavior. Clicking the date and time can open your notifications and widgets, while clock settings control how the time and date appear. Spotlight remains available through its menu bar control or keyboard access, so you don't need to keep every entry visible just because it exists.
A recent menu bar apps list can also make it easier to review tools you've added. Use it as an audit prompt. If an app has been running for weeks without helping you complete a task, remove it from the bar or disable its launch behavior.
Apple's controls have improved, but they don't offer unlimited layout freedom. You generally can't rename system items, create a completely custom order for every icon, or build advanced groups from the native settings alone. That's the point where a third-party organizer may help, but only after you've reduced the clutter Apple can already manage.
For a related workflow improvement, see this guide to custom keyboard shortcuts on Mac. Shortcuts often remove the need to keep a control visible in the first place.
A quick visual demonstration can make the settings easier to recognize:
<iframe width="100%" style="aspect-ratio: 16 / 9;" src="https://www.youtube.com/embed/J1kNT0IIBYo" frameborder="0" allow="autoplay; encrypted-media" allowfullscreen></iframe>Essential Keyboard Shortcuts Worth Knowing
A crowded menu bar often signals that you're using the mouse for tasks the keyboard can handle. Don't memorize every shortcut at once. Choose shortcuts according to the job you're trying to finish.
| Goal | Shortcut | What It Does |
|---|---|---|
| Navigate menus | Command + Shift + ? | Opens Help menu search so you can find an available command |
| Capture the full screen | Command + Shift + 3 | Takes a screenshot of the full display |
| Capture a selection | Command + Shift + 4 | Lets you select an area for a screenshot |
| Open capture controls | Command + Shift + 5 | Opens the screenshot and screen recording toolbar |
| Switch apps | Command + Tab | Moves between open applications |
| Switch windows in one app | Command + ` | Cycles through windows belonging to the current application |
| Open Today view | Command + Shift + A | Jumps to the Today view on supported macOS setups |
Find commands without hunting
If you know what you want but can't remember where Apple placed it, press Command + Shift + ? and search the Help menu. You can then use the arrow keys to move through matching menu commands. This is especially useful in professional apps with deep menus, where opening every menu manually interrupts your work.
Screenshots deserve their own small system. Use Command + Shift + 3 when the entire display matters, Command + Shift + 4 for a selected region, and Command + Shift + 5 when you want the broader capture toolbar. The right shortcut depends on whether you're documenting a bug, sharing a small interface detail, or recording a process.
Reduce context switching
Command + Tab is the familiar app switcher, but Command + ` is the shortcut many newcomers miss. It moves between windows of the same app, which is useful when you have several browser windows, code projects, or documents open.
Clicking the date and time opens Notification Center, while the available focus controls can help you reduce interruptions during a writing or coding block. You can also hold Option while clicking Wi-Fi or Sound to expose additional information and controls. On supported macOS versions, Option combined with the volume keys can help route sound output more directly.
Pick two shortcuts this week. Use them until they feel automatic, then add another pair.
The goal isn't to avoid the menu bar. It's to reserve it for information you need at a glance and use the keyboard for commands you repeat constantly.
Menu Bar Apps That Actually Save Time
A menu bar utility earns its place when it answers a recurring need with almost no setup. The useful question isn't “Does this app have a menu bar icon?” It's “What interruption disappears because the icon is there?”
When the clipboard is part of the job
A clipboard manager such as Maccy or Paste helps writers, developers, and support workers retrieve earlier snippets without repeatedly returning to the source. You copy a product name from a chat, a command from documentation, or a link from a browser, then retrieve it later through the app's shortcut instead of rebuilding the chain of copies.
The trigger is simple: copy several related items during research, then call the clipboard manager when drafting. This is useful for moving between Slack, a browser, an editor, and a terminal without treating the clipboard as disposable.
When focus needs a visible switch
A focus utility such as One Sec or Focus Hours can put a single action near the top of the screen. You're about to write, test code, or review a document, so you invoke the shortcut or click the icon and start the focus routine. The value comes from making the decision easy to repeat, not from adding another dashboard.
Keep the icon visible only if you use it as a deliberate trigger. If it merely reports a state you rarely inspect, let the utility work through its shortcut or notifications instead.
When ideas arrive between tasks
A quick-capture tool such as Drafts or an Obsidian workflow belongs in the menu bar when you regularly lose ideas during meetings, research, or debugging. The moment is familiar: you notice a headline, an implementation detail, or a question you need to investigate. A keyboard command should create a temporary note before the thought disappears.
You can later sort those notes properly. The menu bar's job is to shorten the distance between noticing and recording.
When text needs help inside the current app
An on-device writing assistant can handle a selected sentence without forcing you to open a browser tab or copy text into a separate chat window. A writer can select a paragraph in an editor, trigger the utility, and ask for clearer wording, a different tone, or a translation while staying in the document.
That pattern also applies to code comments, issue descriptions, support replies, and product copy. For broader Mac workflows, this overview of Finder organization utilities offers another way to think about small tools that reduce daily friction. You can also compare menu bar use cases in this guide to Mac menu bar apps.
The strongest setup usually contains a few focused tools rather than every utility that offers a status icon. If an app doesn't save a repeated action, move it out of sight.
Privacy and Security Considerations
A menu bar tool can feel harmless because its interface is small. Its permissions and data path matter more than its icon. Before granting access, ask what the utility reads, where processing occurs, whether it stores content, and whether the app still works when you're offline.
This matters most for writing assistants. A cloud service may need to send selected text to a remote server for processing. An on-device tool can process the same selection locally, depending on the model and configuration. Neither approach is automatically right for every task.
| Dimension | Cloud-Based | On-Device |
|---|---|---|
| Privacy | Selected text may leave the Mac and be processed on a provider's infrastructure | Text can remain on the Mac when the model runs locally |
| Speed | Depends on the network, server response, and provider availability | Depends on the Mac and local model, without a network request |
| Offline use | May stop working without a connection or during service interruptions | Can continue working offline when the required model is installed |
| Transparency | The provider controls the service and may change its processing setup | You can inspect which local model and application configuration you're using |
Match the tool to the text
Cloud processing can be convenient for broad research, difficult transformations, or workflows that depend on a hosted model. Local processing is more suitable for private drafts, confidential client material, internal notes, or situations where you don't want a network dependency.
Check permissions in System Settings, especially Accessibility, Input Monitoring, Screen Recording, Files and Folders, and notifications. A utility may need a permission to capture selected text or respond to a shortcut, but that doesn't mean you should grant every requested capability without reading its explanation.
Privacy check: If you wouldn't paste the text into an unfamiliar website, don't send it to a cloud tool without checking its processing and retention policy.
The choice is a spectrum, not a permanent commitment. You might use a hosted service for a non-sensitive research task and a local model for everyday typing. This comparison of cloud and local AI can help you evaluate that decision by workflow rather than by marketing category.
Keeping Menu Bar Tools Working After macOS Updates
The difficult menu bar question isn't always “How do I hide this icon?” It's often “Will the tool that hides my icons still work after Apple changes macOS?”
Recent coverage of macOS 26 Tahoe and macOS 27 describes rendering and overflow changes that affected hidden-icon managers, including Bartender, Ice, Thaw, Hidden Bar, Barbee, Sane Bar, and Glow. (This review of macOS menu bar managers documents that cluster of compatibility problems.) The lesson is broader than any one app. Tools that organize the menu bar can depend on behavior Apple changes without preserving the assumptions those utilities made.
Why updates cause sudden breakage
A third-party manager may need to observe menu bar layout, move items, or display controls in a custom arrangement. Changes to the rendering layer, overflow behavior, accessibility information, Control Center, or the region around a camera notch can disrupt that work.
You don't need to understand the private implementation to manage the risk. Treat a menu bar organizer as a dependency that needs maintenance, not as a permanent part of macOS.
Use four defenses
- Prefer stable integration points: When choosing a utility, look for apps that use Apple-supported approaches, such as SwiftUI's
MenuBarExtra, rather than relying entirely on fragile interface workarounds. No integration is immune to change, but public APIs give developers a clearer path to compatibility. - Read release notes before updating: After an Apple event or major system release, check the utility developer's compatibility notes before installing the update. If the app controls your visible menu bar, don't assume yesterday's behavior will survive.
- Keep a native fallback: Know where Apple's own menu bar and Control Center settings live. If the third-party organizer stops working, you should still be able to hide supported items and access essential controls.
- Watch developer channels: Release notes, beta announcements, and support pages often reveal compatibility fixes before you discover the problem yourself. Subscribe where appropriate, especially if your work depends on a specific utility.
Apple's native controls are increasingly useful for basic decluttering. Power users may still want persistent grouping or organization, but that convenience comes with maintenance. A reliable setup has both a preferred tool and a simple fallback.
Key Takeaways and Next Steps
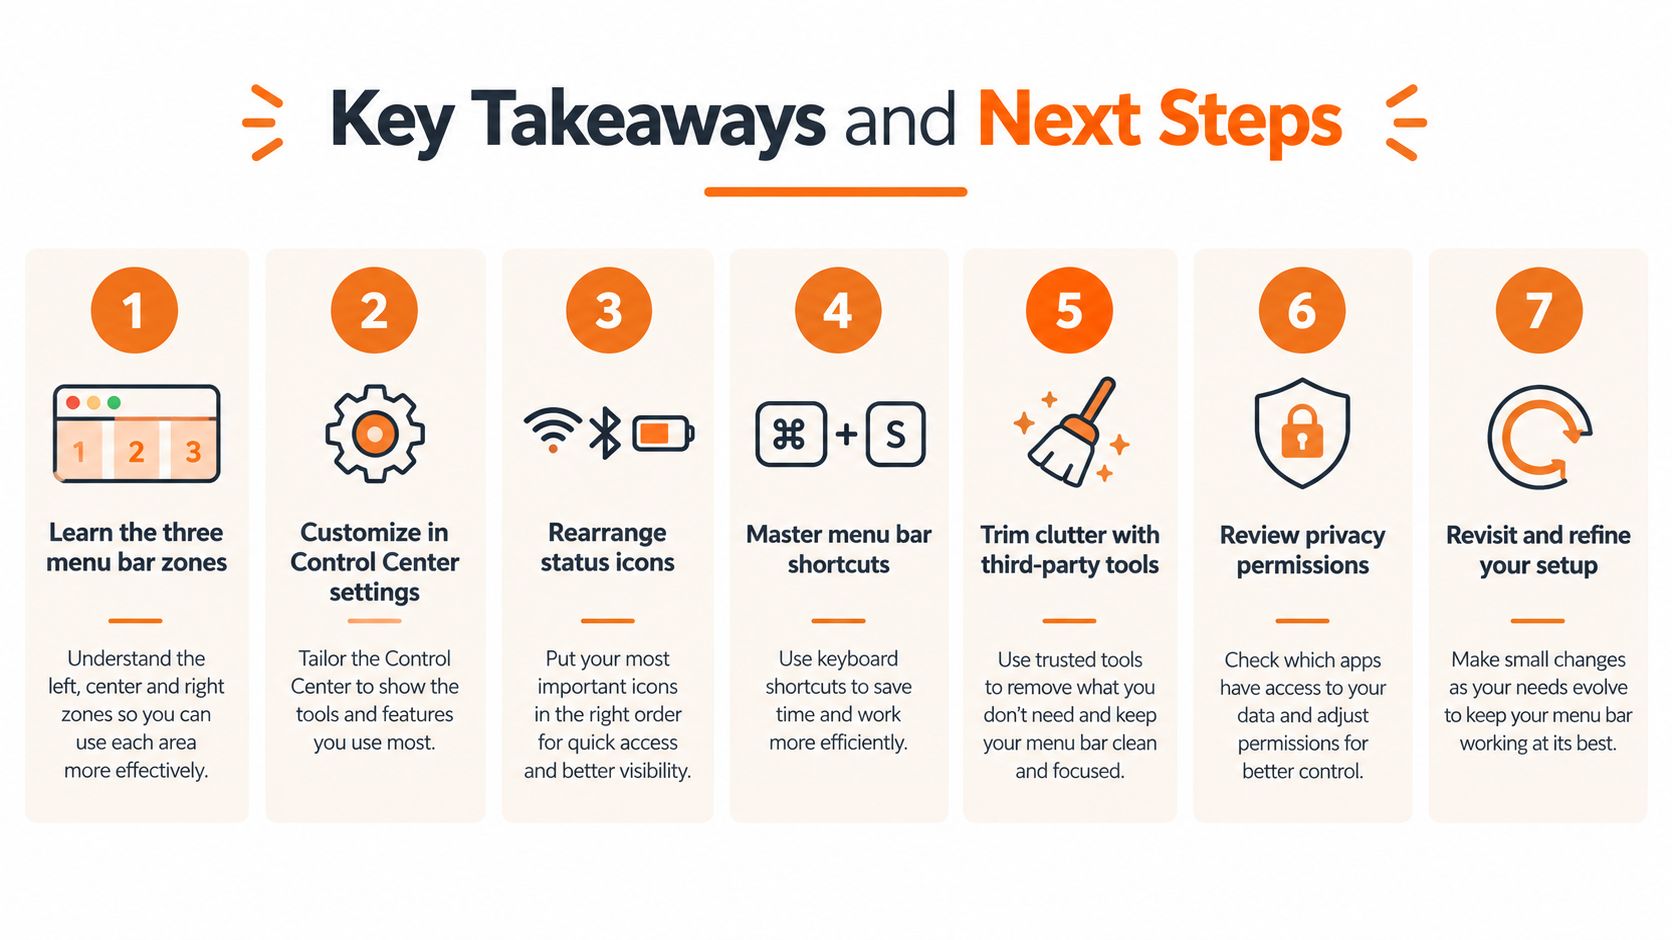
The macOS menu bar works best when every visible item has a job. The left side follows the active app, the right side reports system state, and the flexible space between them has limits. Built-in settings can remove much of the noise, while shortcuts and carefully chosen utilities can reduce the number of times you stop working to search for a control.
Use this checklist as a practical reset:
- Learn the three zones: Identify the active app menus, the flexible center area, and the system status controls.
- Hide stock icons you never click: Move supported items into Control Center or disable their menu bar appearance.
- Enable useful Control Center modules: Keep frequently changed settings easy to reach without displaying every option permanently.
- Memorize a status shortcut: Use the keyboard or a direct click to reach the system information you check most often.
- Set Focus filters: Create a clear trigger for writing, coding, studying, or meetings instead of managing interruptions manually each time.
- Audit menu bar app permissions: Review what each utility can access and remove tools you no longer trust or use.
- Delay major macOS updates when your workflow is critical: Give essential menu bar utilities time to publish compatibility information before you update.
Start today by opening System Settings, choosing the menu bar and Control Center controls, and hiding two items you never use. Then install one utility that solves a specific repeated problem, not one that merely adds another symbol. Finally, bookmark Apple's developer release information and check your essential tools before a major update.
A tidy, intentional menu bar compounds into time saved throughout your work, and the change starts with the small choices made in that strip of pixels.
RewriteBar puts an AI writing assistant in the Mac menu bar, so you can select text in any app and rewrite, clarify, translate, or adjust its tone without leaving your current window. Visit RewriteBar to see how it can fit into a focused, interruption-free menu bar workflow.

More to read
Project Documentation: A Practical Guide for Modern Teams
Learn what project documentation is, the types that matter, and best practices for keeping it useful across software, research, and product teams.
AI Assistant for Emails: A Practical Guide
Discover how an AI assistant for emails can transform your workflow. Learn core features, privacy considerations, and practical tips
10 Keyboard Shortcuts for Mac to Work Smarter
Master keyboard shortcuts for mac with practical categories for navigation, editing, system controls, apps, productivity, customization, and cheat sheets.
Tags
Written by
Mathias MichelPublished
October 3, 2026